The fan is humming, the pump sounds like it is running, the display shows your target temperature — and the water is still sitting somewhere around 60°F hours later. Or the unit cooled beautifully all spring and now, in a hot garage in August, it stalls out ten degrees above where you set it. “My cold plunge chiller is not cooling” is a common complaint with home cold plunge setups, and in many cases the cause is not a dead compressor.
Quick answer: three causes explain most slow-cooling or not-cooling complaints. First, capacity versus conditions — the unit is working correctly, but the tub volume, the room temperature, or a lid-off tub is adding heat faster than the chiller can remove it. Second, restricted airflow or restricted water flow — a condenser pushed against a wall, a clogged pre-filter, or a kinked hose starves the system. Third, heat gain at the tub — an uninsulated shell, no cover, or direct sun undoing the chiller’s work overnight. Electrical faults and sealed-system problems are real, but they come further down the list.
Before you start
Chillers combine mains electricity with moving water, so treat the order of operations seriously.
- Switch off and unplug before you touch anything. For hardwired or 240V units, switch the dedicated circuit off at the breaker first and confirm the display and fan are completely off before touching the unit.
- Never open electrical enclosures, the compressor compartment, or the sealed refrigerant circuit. Capacitors can hold a charge after power is removed, and refrigerant work is restricted to certified technicians in many regions. Owner-serviceable areas are generally limited to filters, strainer baskets, hoses, fittings and the removable intake/exhaust grilles described in your manual.
- Any wiring, breaker, or repeated-trip problem goes to a licensed electrician. Chillers near water belong on a GFCI-protected circuit; hardwired or 240V installs need a licensed electrician, not a workaround.
- Anything under warranty goes to the manufacturer first. Opening a sealed unit or fitting non-approved parts can void coverage. Have your model number, serial number, purchase date and a photo of the display or error code ready before you contact support.
- Health note: this guide is about equipment, not physiology. Cold immersion is not for everyone — talk to a doctor first if you have heart, blood-pressure or circulation conditions, or if you are pregnant. Never plunge alone, enter gradually, and follow the manufacturer’s guidance on session length. See our health & safety disclaimer.
Check these in order
Work top to bottom. The early checks cost nothing and catch most problems; the later ones are where you hand the job over.
1. Confirm the unit is actually in cooling mode at the right setpoint
What it looks like: The display reads a sensible number, but water temperature never moves toward it. Why it happens: Many chillers ship with heat and cool modes, a child lock, a scheduler, or an eco/standby setting. A schedule left over from setup can park the unit in idle during the exact hours you use it, and app-controlled models can be toggled remotely by another household member. What to check safely: Cycle to cooling mode, set a target clearly below current water temperature, clear any timer or schedule, and confirm the clock is correct on units that use real-time scheduling. Verify the reading with an independent thermometer — a drifting sensor or a probe sitting in a dead spot can make a working chiller look broken. Stop and call: if the display disagrees with two separate thermometers by more than a few degrees, that is a sensor question for support.
2. Ambient temperature and where the unit is sitting
What it looks like: Fine in spring, stalls in summer; fine outdoors, worse in a closed garage. Why it happens: A chiller is a heat pump. It removes heat from water and dumps it into the surrounding air, so its usable capacity drops as the air around it gets hotter — and a small enclosed space heats up from the unit’s own exhaust. What to check safely: Measure air temperature at the unit’s intake, not across the yard. Move it out of direct sun, out of a sealed closet, and away from a dryer vent or sauna exhaust. If it must live indoors, give the room somewhere to dump heat. Stop and call: if the unit cannot hold temperature even in cool ambient conditions with everything else ruled out.
3. Airflow and clearance around the condenser
What it looks like: Long run times, warm exhaust recirculating, sometimes a high-pressure or over-temperature alarm. Why it happens: Condenser coils and fins clog with dust, grass clippings, pollen, pet hair and cottonwood fluff. A blocked coil, or exhaust blowing straight into a fence a few inches away, means the heat has nowhere to go. What to check safely: Power down, then look at the grilles. With the unit off and unplugged, remove loose debris from the outside of the grille with a soft brush or a vacuum brush attachment. Restore the clearances your manual specifies on every side, including above. Stop and call: if the fins are bent, oily, or packed solid internally — that is a service clean, not a brush job.
4. Dirty pre-filter, strainer basket, or low water flow
What it looks like: Weak or no return flow into the tub, pump noise changing pitch, cooling that gets worse over weeks. Why it happens: Hair, skin, lint and fine sediment load up the filter. Water is the medium carrying heat to the chiller; cut the flow and you cut the cooling, even with a perfectly healthy compressor. It is one of the most common causes of gradual decline in home systems. What to check safely: With power off, pull and rinse or replace the pre-filter and empty the strainer basket. Multi-stage systems typically use a coarse screen for hair plus a finer cartridge for sediment — both need attention, and the fine cartridge is usually the one that silently clogs. Our cold plunge maintenance guide covers a realistic weekly cadence. Stop and call: if flow stays weak with a brand-new, clean filter installed.
5. An air lock or an unprimed pump
What it looks like: Gurgling, surging, intermittent flow, or a flow alarm minutes after startup — classic after a water change, a hose swap or a tub top-up. Why it happens: Air trapped at the high point of the loop or in the pump housing stops the pump moving water, and many units will refuse to run the compressor without proven flow. What to check safely: Follow your manual’s priming procedure. Generally that means switching the unit off, confirming the tub water level is above the intake, and — only if your manual describes it — loosening the designated bleed point or the fitting at the highest point of the loop to let trapped air escape, then re-tightening before restoring power. Make sure intake and return hoses are on the correct ports and that the intake is not sucking surface air through a vortex. Stop and call: if the pump runs dry or buzzes (switch it off straight away — running dry can damage it), or if it will not prime after two attempts.
6. Hoses: kinks, leaks, length and insulation
What it looks like: Cold at the chiller outlet, lukewarm at the tub; puddles under a fitting. Why it happens: A tight bend behind the unit throttles flow, a loose quick-connect bleeds pressure and sucks air, and long uninsulated hose runs in a hot garage absorb heat on the way to the tub. What to check safely: Walk the whole loop with the system off. Straighten bends, check clamps and O-rings, keep runs as short as practical, and insulate anything exposed. Stop and call: if a leak is coming from the unit body rather than a user fitting.
7. Tub insulation, cover and placement
What it looks like: The chiller reaches target overnight, then the water climbs several degrees between sessions, so the unit never stops running. Why it happens: This is not a chiller fault at all — it is heat gain. A thin-walled tub on hot concrete in the sun with no lid can take on heat faster than a modest chiller removes it. What to check safely: Fit and actually use an insulated lid, get the tub off hot slab with a foam mat, shade it, and insulate thin-walled shells. An insulated cover is one of the simplest cooling upgrades available — see our rundown of cold plunge covers and insulated lids.
8. Power supply, GFCI trips and extension cords
What it looks like: The display lights up but the compressor never engages; the unit resets itself; the GFCI trips on startup. Why it happens: Compressors draw a large inrush current. A long or thin extension cord, a shared circuit running a heater or shop tools, or a loose outlet can cause voltage drop that stops the compressor from starting even though the controls appear alive. Moisture at a plug or connector will also trip a GFCI — which is the device doing its job. What to check safely: Plug directly into a correctly rated, GFCI-protected outlet with nothing else on the circuit, and remove extension cords and power strips entirely — most chiller manufacturers prohibit them. If a plug or outlet is wet, do not touch it until the circuit is switched off at the breaker; let everything dry fully before reconnecting. Stop and call: if the GFCI or breaker trips again after the connection is dry — that is a licensed electrician’s job, and a repeat trip with a dry connection may indicate a fault inside the unit. Do not keep resetting it.
9. Error codes, flow alarms and the sealed system
What it looks like: A letter-and-number code on the panel, a flashing icon, or an app notification. Why it happens: Codes are manufacturer-specific, but they generally fall into a few families: no-flow or low-flow protection, high-pressure or over-temperature protection, sensor open/short faults, low-water or level faults, and communication or Wi-Fi faults. The code is a protection trip, not a diagnosis — the unit is refusing to damage itself. What to check safely: Look the exact code up in your manual or support portal, and address the obvious owner-side cause for its family: flow codes point to filters, priming and hoses; pressure or temperature codes point to airflow, clearance and ambient heat; sensor and communication codes point to support. Photograph the code, note how many minutes it takes to appear after startup, and note what you had just changed. Stop and call: any code that returns after the owner-side checks, any ice or frost forming on the refrigerant lines, any oily residue, loud metallic noise, or burning smell. Never attempt to add, release or otherwise handle refrigerant yourself — stop and contact the manufacturer for authorized service.
Symptom, likely cause, safe next step
| Symptom | Likely cause | Safe next step |
|---|---|---|
| Runs constantly, never reaches setpoint | Capacity vs. tub volume and ambient heat; no cover | Fit an insulated lid, shade the tub, improve clearance, reassess sizing |
| Cooled fine before, slower every week | Loaded pre-filter or dirty condenser coil | Power off; clean or replace filters, brush the grille exterior |
| Weak or no return flow into the tub | Clogged filter, air lock, kinked hose, low water level | Power off; clean filter, top up water, re-prime per manual |
| Flow alarm minutes after startup | Air trapped in the loop or an unprimed pump | Power off; re-prime and bleed air per the manual, confirm hose orientation |
| Worse only in hot weather or a closed garage | High intake air temperature, recirculating exhaust | Relocate, ventilate the space, restore specified clearances |
| Display on, compressor never starts | Standby/schedule, voltage drop, or protection trip | Clear schedules, plug direct to a GFCI outlet, read the code |
| GFCI or breaker trips repeatedly | Moisture at a connection or an internal fault | Stop resetting; call a licensed electrician, then the manufacturer |
| Frost on lines, oily residue, metallic noise | Sealed-system issue | Shut down and contact the manufacturer for warranty service |
| Target reached overnight, warm by evening | Heat gain through shell, lid and ground | Insulate, use a cover, raise the tub off hot concrete |
When it’s a sizing problem, not a fault
A fair number of “not cooling” cases are a working chiller asked to do too much. Cooling capacity is a rate, not a guarantee: a given BTU-per-hour output has to overcome the water volume, the surface area losing cold to warm air, the heat conducted through the shell and into the ground, and whatever your body adds each session. Double the gallons, or move the tub from a cool basement to a sunlit patio in July, and the same unit will take noticeably longer — or settle at a floor a few degrees above the number on the display. Manufacturer pull-down times are published for a stated starting temperature and stated conditions; your garage is not a lab. If you want the math behind the labels, our explainer on BTU vs HP and real recovery times unpacks how those numbers translate.
Practical rule of thumb: match capacity to the warmest conditions you will actually use, not the mildest. If your checks all come back clean and the unit simply cannot keep up with a large, poorly insulated tub in a hot climate, more capacity — or better insulation — is the fix, not a repair. Two example setups illustrate the two main routes: more chiller capacity, or a smaller chiller paired with an insulated tub.
The TURBRO 1 HP 9,300 BTU Cold Plunge Chiller is the higher-capacity of the two examples here. The listing states a maintained range of 36–86°F, compatibility with tubs from 80 to 132 gallons, a rotary compressor with a titanium heat exchanger, and a pull-down from 110°F to 36°F in roughly five to six hours depending on conditions. For troubleshooting purposes, two details matter: it uses a three-stage setup — a 40μm screen for hair and debris, a 20-micron cartridge for fine sediment, plus an ozone generator per the listing — so there are specific, owner-accessible points to check when flow drops, and the Wi-Fi app (2.4GHz required) lets you see status and schedules rather than guessing why the unit is idle. The trade-off is that a 1 HP class unit needs real clearance and a sensible spot to dump its heat.

- No Ice Needed: The cold plunge chiller maintains water temperature from 36-86°F automatically, eliminating the need for ice. It's …
- Universal Tub Compatibility: The ice bath chiller works with standard bathtubs, soaking tubs, inflatable tubs, and professional pl…
- Rapid Cooling System: Built-in circulation pump ensures stable water flow; rotary compressor and a titanium heat exchanger for bet…
The AS ColdPlunge 1/3HP Ice Bath Chiller & 100 Gal Tub Bundle takes the other route: rather than maximum capacity, it reduces the sizing guesswork by shipping the chiller, external pump, 20-micron filter, insulated hoses, quick-connect fittings and a matched 100-gallon tub together. The listing specifies cooling down to 42°F, an LED touchscreen for setting and monitoring the target, reinforced PVC with 10 mm EPE insulation in the tub, a submersible pump option for bathtub use, and a one-year warranty with support that the listing says responds within 24 hours. The insulated shell is doing real work here — as the checklist above shows, good insulation can narrow the gap between a smaller chiller and a bigger one fighting an uninsulated tub. The trade-off is a higher temperature floor than a 1 HP unit, which matters most in hot climates.
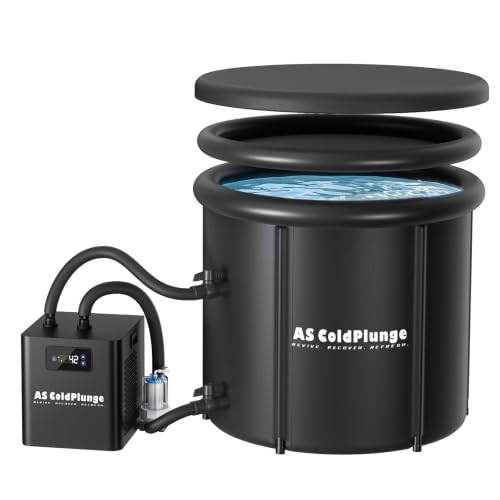
- COMPLETE 100 GAL COLD PLUNGE SYSTEM – Skip the daily ice runs and build your cold plunge routine at home. This complete kit includ…
- ICE-FREE COOLING DOWN TO 42°F – The 1/3 HP cold plunge chiller actively cools water down to 42°F and helps maintain your selected …
- 100 GAL INSULATED ICE BATH TUB – The included 100-gallon round ice bath tub is built with reinforced PVC and 10 mm EPE insulation …
Whichever direction you go, remember that any chiller near water belongs on a GFCI-protected outlet, and any 240V or hardwired installation needs a licensed electrician. If you are still at the planning stage, our roundup of cold plunge chillers covers how capacity classes line up with tub sizes.
Frequently asked questions
Why is my cold plunge chiller not cooling at all?
If there is genuinely no cooling — not slow cooling — start with mode and schedule settings, then water flow. A chiller that cannot prove flow will usually refuse to run the compressor as a protection measure, so a clogged filter, an air lock, a low water level or a kinked hose can look exactly like a dead unit. Next, check that it is plugged directly into a correctly rated GFCI-protected outlet with no extension cord, since voltage drop can stop a compressor from starting while the display stays lit. If the fan runs, flow is good, power is solid, and the water still never drops, it is time to contact the manufacturer.
What does a chiller error code mean?
Error codes are manufacturer-specific, so the only authoritative source is your own manual or support team — never a code list for a different brand. That said, most codes belong to a family: low or no flow, high pressure or over-temperature, a sensor fault, a water-level fault, or a connectivity fault. Flow and level codes are usually owner-fixable through filters, water level and priming. Pressure and temperature codes usually point to airflow, clearance or a hot environment. Sensor and internal faults are a support call. Photograph the code and note when it appears before you contact the manufacturer — it speeds up service considerably.
How long should a cold plunge chiller take to cool the water?
It depends entirely on starting water temperature, gallons, insulation, ambient air and the unit’s capacity, which is why manufacturers quote pull-down times against specific stated conditions. The useful habit is to establish your own baseline: when everything is clean and working, record how long your setup takes to go from tap temperature to your target. Later, a slowdown against your own baseline is a far better fault signal than any generic figure. Note that initial pull-down is always slower than holding temperature once the water is cold and covered.
Can a cold plunge chiller freeze up or ice over?
Visible frost or ice on refrigerant lines or the heat exchanger is a stop-and-call symptom rather than something to chip away at. It commonly accompanies restricted water flow or a sealed-system issue, both of which push the system outside its design envelope. Switch the unit off and unplug it (or switch off the breaker for a hardwired unit), let it return to room temperature, check the owner-accessible flow path — filter, strainer, water level, hose kinks — and if frost returns on restart, contact the manufacturer rather than running it. For outdoor tubs in freezing climates, winterization and freeze protection follow the manufacturer’s instructions, and our winter outdoor cold plunge gear guide covers the surrounding kit.
Many not-cooling complaints are resolved in the first few checks, and many turn out to be maintenance rather than repair. Build the filter rinse, coil check and cover habit into a weekly routine and you will spend far less time troubleshooting — and when something genuinely does fail, you will have ruled out the easy causes before you pick up the phone.


Leave a Reply